

Stenciling is easy, enjoyable, and provides a sense of artistic fulfillment. Handmade pieces have an irresistible beauty and vibe, a consistency that store-bought art cannot cope with. Not to mention, stencils are inexpensive. With good care and handling, you can reuse a high-quality mylar stencil several times.
A dab (or roll) of paint is all it takes to create an impressive concept for a fraction of the cost. But ever wonder how to make a stencil from a picture without Photoshop? Here is how.
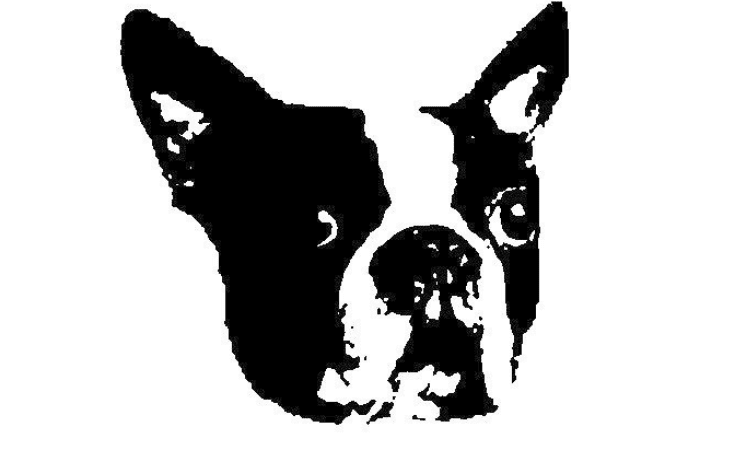
Can you make a stencil from a picture without Photoshop? If you haven’t already saved your picture to your screen, go to Google Images (or any image site you prefer) to keep those.
- Activate Microsoft Paint.
- Start MS Paint and view your image.
- Zoom in by moving to Display and clicking Zoom- Now, use the Select options to hack away at the backdrop and unused areas.
- Please use the toolbox to pick and build a box, right-click and choose the Copy option.
- Start Microsoft Word. Copy and paste the picture onto the screen by right-clicking it.
- Make changes to the size and shape.
- Right-click the image and pick Format Picture.
- Set the color to “Grayscale.”
- Set the “Contrast” slider to 100%.
- Return to “Format Image” and adjust the “Brightness.”
- This will alter the number of dark and light spaces in your stencil
- Copy the file and paste it into your Paint software once more.
- To obtain the perfect stencil “style,” erase and fill in where appropriate.
- This is beginning to sound a lot like a makeup tutorial XD The finished product will not be as fine as the first “draft,” but it would be better to use it as a stencil.
How to make a stencil in Photoshop?
- Upload the picture from which you want to make a stencil into Photoshop.
- To use this method, go to “Picture,” “Adjustment,” and “Threshold.” Your picture will be converted to black and white.
- As you move the slider left and right, you’ll get more or less information. Play with the slider until you reach a setting that gives you solid lines without losing too much information.
- Here’s an excellent opportunity for your photo to have some background details slogging the picture. Use a big white painting to remove any information you don’t want to see easily. To render solid black environments, use a black painting to cover areas with white.
- When you cut and paste the stencil, you will be extracting the black spaces so that you can paint through them. This implies that where there are isolated white data, they must be bound to the rest of the white space to be cut properly. To quickly secure your islands to the rest of the white room, use the white Painting.
- If you’ve completed all of your connections, choose Filter and Artistic “Cutout.” This would make the picture have straighter angles, making it easier to cut off.
- The various sliders allow you to change the amount of flattening that the filter adds to the picture. The “Line Simplicity” slider can make your edges straighter, giving your picture a stencil-like appearance. There would be a significant reduction in detail, which will make cutting the stencil much simpler.
- Analyze the whole stencil for any disconnected islands or extraneous information. Don’t be concerned with stray lines; you should just forget them when you remove the stencil.
- You should print out the stencil until you’re done with it. Print it on thick paper to ensure the stencil’s durability. If you want to conserve ink, you should set the printing color to grayscale.
- After printing the stencil, all that remains is to cut it out and use it. Using a pair of scissors, hack out all of the image’s black bits.
- And be sure to pay close attention to your island connections so that you don’t miss something. When you’re done, all that should be left are the image’s white bits, with open space where the black parts used to be.
- Learn more about Photoshop alternative software.
What Basic Stencil Supplies You Need To Work Without Photoshop?
When you are going to make stencils without Photoshop, you have to go with the basics. Also, collect all the necessary items before you start. You want to run around your workshop to get a brush or look for a wipe to clean wasted paint.
- Adequate lighting—the best natural daylight
- Table for working.
- To cover surfaces with a large roll of paper
- A smooth surface into which to spill paint
- Anything to take the paint from the brush and offload it (rag or plank of wood)
- Water container
- Brush for stencil
- Other color brushes with a specialty
- Sandwich bags in a packet (for storing wet paintbrushes)
- Cling film (for wet paintbrushes or to cover trays)
- Glass roller with a high-density sponge roller
- Tape for masking
- A pencil, a measuring tape
- Scissors – helpful in reducing the exterior stencil’s footprint in narrow spaces.
- Spray adhesive for stencils – if desired.
- The preferred color
- A stencil filing system
- Nearby storage for paint materials
How to stencil with basic supplies?
- Place the color onto a suitable flat surface.
- Squeeze the brush into the color, then blot the excess on a wall, such as a towel. Your brush should be tap-dry.
- Place your stencil, slip, and tap your brush into the stencil. If your brush’s dry enough, you can even ‘wire’ your brush.
Conclusion
You can easily take your furniture or showpiece beautification to another level with stencil art. Photoshop is the best tool to go and design the stencil by any means possible. However, you don’t have to be techy or expert in editing to be an artist.
Photoshop takes time and patients to master it completely. But it should not stop you from making some fantastic stencil art with only the use of pictures. So learning how to make a stencil from a picture without Photoshop can make your life easier to continue your hobby


