
This is a step by step guide on “How to Make a Transparent Background in Pixlr?”.
Making a transparent background is a simple trick. But many of us, especially the beginners, troubles a lot to create one.
For those who don’t know how to make an image transparent in Pixlr E, this tutorial is only for them.
The best part of this guide is- anyone can do it with zero skills in editing.
Even you don’t need to use Photoshop to make this happen.
So, let’s dive into it.
How to Make a Transparent Background in Pixlr?
Follow the below step by step guide to create a transparent background in Pixlr.
Step 1. Visit on Pixlr E
In the very first step, visit on the official webpage of Pixlr E by clicking here.
From the homepage, tap on the Create New button that can be found under History.
When you click on the button, a dialogue box will appear on the screen.
Choose an image size and give the title of your new image. Here, in my case, I choose Web Small and put the name as Transparent Background.
Make sure the Background option is disabled as we want to create a transparent one.
Then, click on the Create button. And here is our new transparent background.
Step 2. Open an image
Now, open the photo you want to place on the transparent background.
To import a photo, go to File > Open Image.
It brings you directly to your gallery. From there, select the picture you wish to edit.
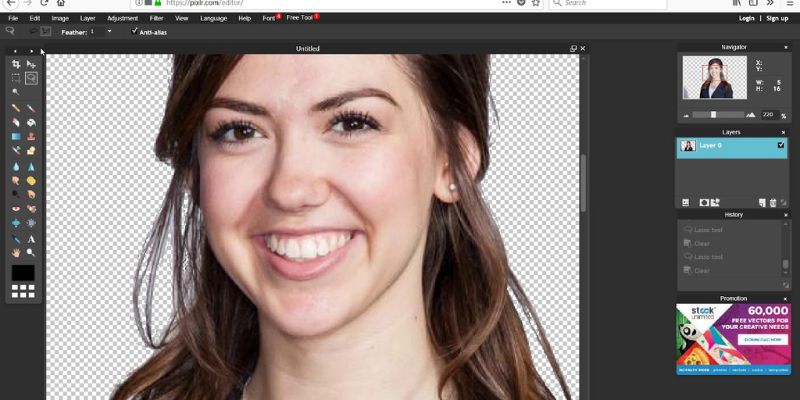
Here is my original photo that I want to put it on a transparent background.
Step 3. Resize the photo
In this step, I need to resize the photo as you can see that the photo size is a little bit large than our previous created transparent background.
The width and height of this photo are according to 1500 by 1500. So, we should resize it.
To resize the photo, go to Image > Image Size from the top bar. It brings a dialogue box like this:
From there, put the value that fits with the created (we did it in Step 1) transparent photo’s size.
So, I put this value- 600 x 600.
Then, tap on the Apply button to save this.
Step 4. Create a selection with Wand Select
From the left toolbar menu, first, choose the Zoom tool and zoom in your photo.
Next, select the Wand Select tool from the toolbar. Then, click on the white space (pressing shift button from the keyboard) of your photo that makes a selection around the picture.
Now, inverse the selection going to Select > Invert Selection. You can see that it only selects the subject that I want to place on the transparent background.
Step 5. Place the subject on the transparent background
This time choose the Arrange tool from the left toolbar menu.
Then, go to Edit > Copy. It selects and makes a copy of the subject.
And then, select the transparent background.
Next, head over to Edit > Past to place the subject on the transparent background.
It’s amazing! You can now place the subject on a transparent background successfully.
Step 6. Save the Image
Finally, it’s time to save the picture. To do that, go to File > Save. It brings up a dialogue box name Save Image.
From the box, make sure you select the PNG as your file type.
Lastly, tap on the Download button to save it on your computer.
Thus it.
Conclusion
As I told you at the beginning of this guide that making a picture transparent in Pixlr is super simple.
To make a transparent background in Pixlr efficiently, follow the step by step guide I mentioned above.
Forget the step by step method? Don’t worry. I have broken them down here again.
- Visit on Pixlr E
- Open an image
- Resize the photo
- Create a selection with Wand Select
- Place the subject on the transparent background
- Save the Image
I hope you find this guide helpful and now you know how pixlr makes background transparent. If so, then don’t forget to share it with your friends.
Do you have any questions about this? Then, let me know by leaving a comment below.


