
Dream of a photo editing software that lets you edit photos, create breathtaking designs, and collages?
Then, Picmonkey is available out there to bring your dream into reality.
Yes, this single online photo editor app allows you to edit, create designs, and makes collages.
And the best part is- all of these you can do without spending a single buck. In simple words, it’s completely free!!
But the question is- how to use Picmonkey when I never edit with this or a newbie?
Don’t worry!
This online image editor has no steep learning curve. And its interface is super-simple. So, anyone can use it without having previous editing skills.
In this guide on Picmonkey Tutorials, we break down everything about photo editing, creating design, and others using this app.
So, let’s get started right here.
How to use Picmonkey?
From this chapter, you can learn how you can edit photos, create a design or post, and collage.
Before getting started, make sure you sign up with your Google account (Gmail). Otherwise, you can’t use this online image editing app.
Edit A Photo
Once you sign up with your Gmail, it brings up a page like this below screenshot.
From the homepage, click on the plus icon, and it shows a dialogue box named Open Image From.
You can open images from different sources like your computer, google drive, Instagram, or stock photos.
For example, I choose Stock Photos that show a million photos.
Select an image from there and click on the Edit Image button.
On the left side of the window, you can find each of the image editing features like Crop Canvas, Resize, and others.
Also, you can find a lot of effects and overlays to make your picture stunning.
The best part is- each of the editing tools are slider-based. So, retouching up a picture with this software is a breeze.
For example, I want to add text to this photo. So, from the top left-side, I tap on the Text tool. Once you click on the text tool, it opens a box like the below screenshot.
Choose any text layouts from there and type what you want to add.
However, you can also add your own text.
To do so, tap on the Add text option that brings up a dialogue box
If you want, you can change the font as there are millions of text fonts available.
You can adjust letter-spacing, line height, and fade. Therefore, you can also apply text effects like shadow, curve the text, or apply drop shadow.
Here how the text looks like after making adjustments:
If you are happy with this result, you can download the photo.
Note: You can’t download the picture if you don’t upgrade the free plan.
Or, you can do this by starting a free trial.
Further, you can remove background from photos, remove blemishes, and other editing workflows using Picmonkey.
Create A Graphic Design:
From the Picmonkey homepage, click on the plus icon again, and this time select Templates.
When you tap on Templates, you can find the interface like the below screenshot.
Pick a template from the page according to your choice.
For instance, I pick this as the valentine’s day is knocking at our door.
Now, I can adjust the text, add graphics, and apply effects to tweak this picture.
As an example, I want to make the font large. So, I double click on the text, and it brings up the Text pop-up box.
From there, I increase the text size from 32 to 72, apply text effects, and adjust the line-height.
After applying the adjustment, I get this result.
If you want, you can also add graphics. In this case, tap on the Graphic that shows various types of graphics category.
But, as this is a graphic I made for valentine’s day, I type love in the search box.
Voila! I get these love shapes:
From the shown results, I select this one.
Next, click on the shape icon that brings up the graphic pop-up box. And set the Fade to 42%.
Here is the result I get after tweaking some settings:
Create A Collage
To create a collage, tap on the plus icon from the homepage and choose Collage from the pop-up box.
Once you click on Collage, it shows you a box like the below screenshot.
Pick a collage size from there and tap on it that opens up the collage interface.
To add photos, click on Photos & Video that shows you pictures.
From there, you can add your own photos or use the stock photos to create a collage.
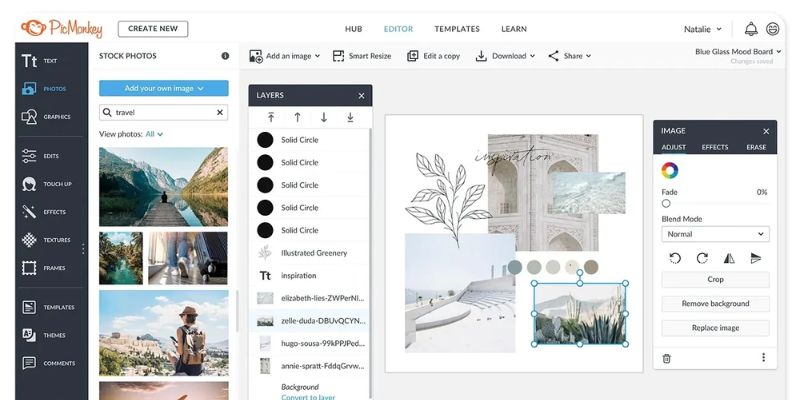
For example, I use the stock photos from Picmonkey and make a collage that looks like this.
Conclusion
I hope you can find this guide on how to use Picmonkey helpful.
Using this image editor, you can do anything from editing to creating collages and graphics design.
Surprisingly, it’s completely free. But the downside of this is- you can’t download images in the free version.
Upgrading the plan, you can enjoy every feature this app offers. You can create social posts, create breathtaking pictures, and stunning graphics.
Another great feature of this software is- it automatically saves your photo in its cloud name Hub. And it never flatten downs. So, you can edit anytime according to your wish.
Now, it’s up to you!
Are you going to use this to edit pictures, create social posts & collages, and graphics?
Let us know by leaving a comment below.
FAQs
What can you do with PicMonkey?
You can do everything from photo editing to create graphics. Besides, you can create social posts, touch up images, make collages, and so on.
Why is PicMonkey not free anymore?
Running, upgrading, and bringing new features take a lot of bucks to run. To carry the expense, Picmonkey allows users to upgrade the free plan to enjoy and unlock all the image editing features. Keep in mind; you can still enjoy some editing features for free.
How long is PicMonkey’s free trial?
You can enjoy Picmonkey’s free trial for seven days.


